-
E-mail
sales@shmingzi.com
-
Phone
15358830119
-
Address
Building 1, 388 Dengyun Road, High tech Zone, Kunshan City, Jiangsu Province
Product Categories
Kartes Optical Instruments (Suzhou) Co., Ltd
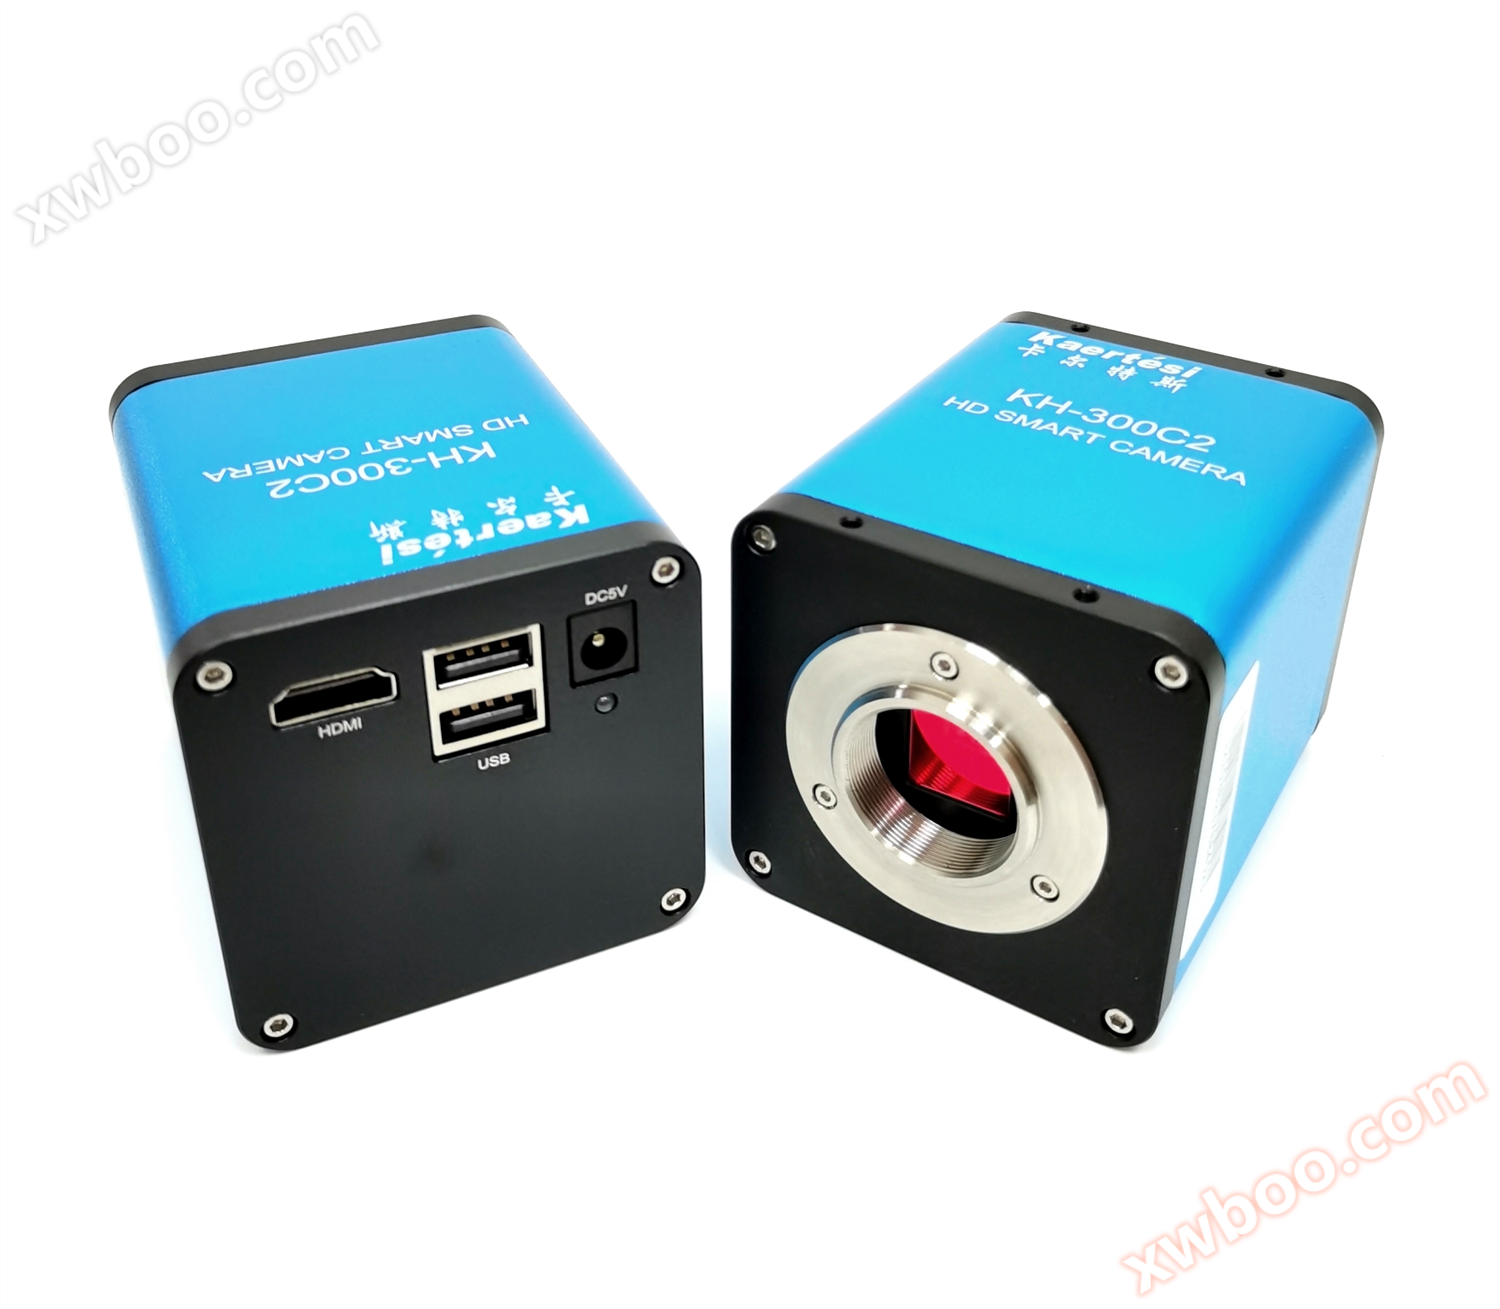
KRTS KH-300C2 High Definition Industrial Measurement Camera
NegotiableUpdate on 12/08
- Model
- Nature of the Manufacturer
- Producers
- Product Category
- Place of Origin
Overview
1、 Camera external dimensions 2. Camera interface introduction 1. HDMI interface, 2. 3. USB interface (can be plugged in with mouse and USB flash drive), 4.5V power interface, 5. LED indicator light 3. Camera matching device 1. Front end matching: C-port microscope and C-port lens
Product Details
1、 Camera dimensions


 2、 Introduction to Camera Interface
1. Front end matching: C-port microscope and C-port lens.
2. Backend matching: Supports HDMI 1080P@60Hz perhaps 1080P@50Hz monitor.
4、 Camera installation instructions
1. Connection between KRTS KH-300 camera and C-type lens.
2. Connect the monitor and camera using an HDMI cable.
3. Connect the mouse.
4. Use an adapter power supply to power the camera.
5、 Introduction to Menu Bar Functions
1. Language switching: Click on "Simplified" in the upper left corner of the menu, and you can switch between Simplified Chinese/English/Traditional Chinese/Japanese in the drop-down box.
2. Lock menu: Click the lock icon in the upper right corner of the menu to switch the menu display status.
When selecting 'Auto Exposure', the 'Brightness' can be adjusted; When selecting 'Manual Exposure', the 'Gain' can be adjusted. When selecting 'Manual White Balance', the 'Red Green Blue' color values can be adjusted.
5. Contrast: 0-15 values can be adjusted, reset the default value to 0;
6. Sharpness: adjustable from 0-15, reset to default value of 4;
7. Electronic amplification: 0-50 adjustable, reset to default value of 0.
8. Cross lines can be set and hidden, and colors can be selected. 9. Select "Save Image" and save it to a USB drive according to the selected naming convention.
10. Open Image: Click on the icon to open the path where the image is stored. Select the image to open and preview it directly on the monitor; Below the image, you can perform operations such as zoom in, zoom out, full screen, 1:1, previous, next, delete, and return.
11. Click on "Compare Images", the opened image will be displayed on the right side of the interface, and the real-time image will be displayed on the left side.
12. Click "Freeze" to freeze the current image interface, and the image window will remain stationary, making it easier to observe the object being measured.
When selecting "Record", the Rec icon appears at the bottom right of the screen to start recording. Click the "Record" button again to stop recording and automatically save to a USB drive in H264 format.
14. "Photo Settings" allows you to set the image format and naming conventions, with the selected format being BMP or JPG.
15. Select "Yes" to save the measurement elements on the image, and select "No" to not save them.
16. Inverted: Flip the image vertically; Flip: Flip the image horizontally.
17. Black and White: Black and White color mode. 18.50/60HZ: Anti screen flicker.

1. The device requires a DC5V power supply.
Before powering on the device, please connect the mouse first.
When saving images/videos, the folder is named after the date.
4. Support pedal and controller operation.
*All accessories are subject to the actual product

1.HDMI interface, 2,3. USB interface (can accommodate mouse and USB flash drive), 4.5V power interface, 5. LED indicator light
3、 Camera matching device1. Front end matching: C-port microscope and C-port lens.
2. Backend matching: Supports HDMI 1080P@60Hz perhaps 1080P@50Hz monitor.
4、 Camera installation instructions
1. Connection between KRTS KH-300 camera and C-type lens.
2. Connect the monitor and camera using an HDMI cable.
3. Connect the mouse.
4. Use an adapter power supply to power the camera.
5、 Introduction to Menu Bar Functions
1. Language switching: Click on "Simplified" in the upper left corner of the menu, and you can switch between Simplified Chinese/English/Traditional Chinese/Japanese in the drop-down box.
2. Lock menu: Click the lock icon in the upper right corner of the menu to switch the menu display status.
When selecting 'Auto Exposure', the 'Brightness' can be adjusted; When selecting 'Manual Exposure', the 'Gain' can be adjusted. When selecting 'Manual White Balance', the 'Red Green Blue' color values can be adjusted.
5. Contrast: 0-15 values can be adjusted, reset the default value to 0;
6. Sharpness: adjustable from 0-15, reset to default value of 4;
7. Electronic amplification: 0-50 adjustable, reset to default value of 0.
8. Cross lines can be set and hidden, and colors can be selected. 9. Select "Save Image" and save it to a USB drive according to the selected naming convention.
10. Open Image: Click on the icon to open the path where the image is stored. Select the image to open and preview it directly on the monitor; Below the image, you can perform operations such as zoom in, zoom out, full screen, 1:1, previous, next, delete, and return.
11. Click on "Compare Images", the opened image will be displayed on the right side of the interface, and the real-time image will be displayed on the left side.
12. Click "Freeze" to freeze the current image interface, and the image window will remain stationary, making it easier to observe the object being measured.
When selecting "Record", the Rec icon appears at the bottom right of the screen to start recording. Click the "Record" button again to stop recording and automatically save to a USB drive in H264 format.
14. "Photo Settings" allows you to set the image format and naming conventions, with the selected format being BMP or JPG.
15. Select "Yes" to save the measurement elements on the image, and select "No" to not save them.
16. Inverted: Flip the image vertically; Flip: Flip the image horizontally.
17. Black and White: Black and White color mode. 18.50/60HZ: Anti screen flicker.
19. HDR: Wide dynamic range, adjustable from 0-3, reset to default value of 1.
20. Reset: Restore to factory settings.
21. Version number, which allows you to view the current software version number.

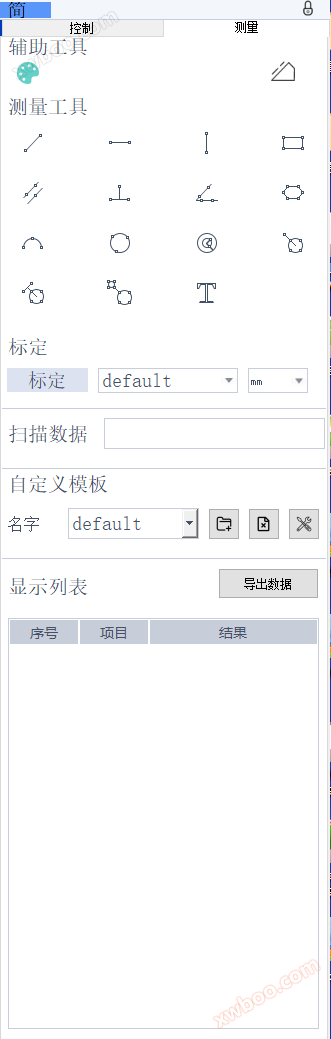
Auxiliary tools
Color settings: You can set the width and color of line segments, as well as label font size and color.
Automatic edge searching:
Click on the 'Auto Edge Finding' icon in the auxiliary tool to automatically find edges when measuring images.
Measurement tool:
Straight line, horizontal line, vertical line, rectangle, parallel line, vertical line, angle, polygon, arc, circle, concentric circle, line circle, vertical line circle, two circles, annotation.
Calibration:
Add calibration: straight line calibration, H-shaped calibration, circle calibration.
Select calibration: Select the added calibration corresponding to the current magnification.
Select Unit: Select the unit for the line label.
Delete calibration: Select the corresponding delete button in the calibration drop-down box.
Custom Template:
The graphic drawn in the image using measurement tools is saved as a template, and when saved again, the graphic can be opened directly. The template file is saved in a USB drive.
Add Template:
1. Draw a rectangle in the image (example).
2. Click on "New" Icon, pop-up prompt 'Do you want to convert graphic elements into templates', select' OK '.
Icon, pop-up prompt 'Do you want to convert graphic elements into templates', select' OK '.3. Enter the name in the box after the name and click save .
.
.Switch template: Select the added template from the drop-down box corresponding to the name.
Template modification: Click to modify After clicking the button, you can add graphics to the original template, and then click 'Save' or 'Save As' to create a new file.
After clicking the button, you can add graphics to the original template, and then click 'Save' or 'Save As' to create a new file.Delete Template: First select the template from the drop-down menu, and then click Delete Prompt whether to delete the current template, click 'OK' to delete it.
Prompt whether to delete the current template, click 'OK' to delete it.Display List:
Display the serial number, item, and measurement result of the drawn line in the list. A single item can be selected with the left mouse button and operated with the right mouse button to delete a single item or delete all items.
Export Data: Click on 'Export Data' in the display list, enter a name in the pop-up dialog box, and save the corresponding file on the USB drive.
6、 Precautions for use1. The device requires a DC5V power supply.
Before powering on the device, please connect the mouse first.
When saving images/videos, the folder is named after the date.
4. Support pedal and controller operation.
*All accessories are subject to the actual product
|
PRODUCT MODEL |
KRTS KH-300C2 |
|
SENSOR |
CMOScolor |
|
Effective pixels |
200megapixel |
|
Target size |
1/1.9」 |
|
menu |
all-digitalUIdesign |
|
operating mode |
Mouse operation |
|
Lens interface |
Ctype |
|
power supplyDC |
DC5V |
|
Output |
HDMI |
|
white balance |
hand movement/automatic |
|
Exposure method |
hand movement/automatic |
|
Display frame rate |
1080P@60fps / 1080P@50fps |
|
Scanning method |
progressive scanning |
|
Electronic Shutter |
1/50s(1/60s)~1/10000s |
|
operation temperature |
0℃~50℃ |
|
Digital amplification |
support |
|
Storage function |
Support external connectionsUDisk storage |
|
Measurement function |
Support measurement |
Similar Product Recommend